Jump Break ဆုိတာ ဘာလဲကြာ? ေမးမေနပါေတာ့နဲ႕ဗ်ာ။ တင္ထားတဲ့ ပုိ႕စ္ (posts) ေတြကို အျမည္းေပးထားၿပီး read more နဲ႕ ျပန္ညႊန္းတာကို ေျပာတာပါပဲဗ်ာ။ ပ်ိဳ႕ေမာင္ႀကီး မွာ ''အုိကြာ ဆက္ဖတ္မယ္ကြာ'' ။ လိုခ်င္ရင္ေတာ့ ...
Creating 'After the jump' summaries
Creating jump breaks in your blog posts can be easily done right from the post editor, without the need for any HTML changes. First, decide where in the post you want to create the jump break, and place your cursor in that position:

Once your mouse cursor is placed at the jump point, simply click the Insert Jump Break toolbar icon:

Clicking the icon will insert a grey bar at the cursor point, illustrating where in the post your break will appear. The bar can be dragged though, so you can always re-position it after insertion.
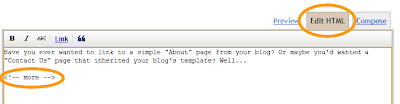
If you don't use the new post editor, you can still insert a jump break in Edit HTML mode by adding where you want to position the jump break.
Once you are set on the jump break's location within the post, you are ready to publish your post. After publishing, you will notice that the Read More link is placed where you set the jump break:

Clicking on the Read More link will then display the full text of the post:

If you feel like changing the Read More text to your own custom phrase, you can easily do this from the Layout | Page Elements tab. Click Edit on the Blog Post widget, and then change the Post page link text to whatever you'd like.

One more note, the Jump Break feature does not change how your post appears in your feed. You can configure post feed options by going to Settings | Basic | Site Feed, and editing Allow Blog Feeds.
Note:For those using a customized third-party template, you will have to add a snippet of code to make Jump Breaks work.
To do this, access your blog's Layout | Edit HTML tab, and first backup your template by clicking the Download Full Template link at the top of the page. This will download an XML version of your template which you can upload later at any time if you need to.
After backing up your template, then click the Expand Widget Templates checkbox, and scan your HTML for the following snippet:
<data:post.body/> Once you've located that code, paste the following snippet directly below it:
<b:if cond='data:post.hasJumpLink'>

<div class='jump-link'>

<a expr:href='data:post.url + "#more"'><data:post.jumpText/></a>

</div>

</b:if >
After you've pasted in the code, click Save and then you're done!
ဒါပါပဲ တဲ့ ခင္ဗ်ာ။
Post's History
ဒါေလးကုိ ကြ်န္ေတာ္ ဘယ္လို ေတြ႕ခဲ့တာလဲ ... အမွတ္တရ ေရးလုိက္ပါအံုးမယ္ဗ်ာ။ ကြ်န္ေတာ္ အရင္က ကုိညီေနမင္းဆုိက္မွာ ''ဘေလာ့ဂ္ ပုိ႕စ္ ေခါက္နည္း'' ကုိ ဖတ္ၿပီး လုပ္ၾကည့္ခဲ့တယ္။ မရတာနဲ႕ လုပ္ထားတာေလး ျပန္ဖ်က္ခဲ့တယ္ ၊ ျပန္ၿပီးေတာ့လဲ မတင္ျပထားခဲ့တာဗ်။ ပုိ႕စ္ေတြကုိ အမ်ိဳးအစားအလုိက္ ျပတဲ့အခါမွာပဲ ျဖစ္ျဖစ္၊ မ်က္ႏွာဖံုး မွာ အသစ္တင္ထားတာကုိ အေရအတြက္နဲ႕ ခ်ျပတဲ့အခါမွာပဲ ျဖစ္ျဖစ္ ပုိ႕စ္ေတြ ရွည္ေနရင္ စာဖတ္သူ မေျပာနဲ႕ ကုိယ္တုိင္ေတာင္ စိတ္ေနာက္မိတယ္။ [ကြ်န္ေတာ္ကေတာ့ စာအုပ္တစ္အုပ္လို သေဘာထားၿပီး ''မ်က္ႏွာဖံုး - ေက်ာဖံုး '' လို႕ နာမည္ေပးထားတာ။ အေတြ႕မ်ားမွာက ...> မူလစာမ်က္ႏွာ၊ Home ၊ Home Page ဘာညာေပါ့ဗ်ာ။ တကယ္ေတာ့ ဘေလာ့ဂ္မွာ Home Page မရွိဘူး တဲ့၊ ၀က္ဘ္ဆုိက္မွာပဲ ရွိတယ္တဲ့ ။ ကြ်န္ေတာ္တုိ႕ ဘေလာ့ဂ္ေတြက blogger ၀က္ဘ္ဆုိက္ရဲ႕ ကိုင္းဖ်ားကုိင္းနားေလး တစ္ခုပါပဲ။ အဲဒါေၾကာင့္ မရွိတာေပါ့ေလ။ ကြ်န္ေတာ္ Jump Break ပံုစံကုိ သိခ်င္လုပ္ခ်င္လြန္းလို႕ ခဏခဏ လုိက္ရွာခဲ့တာ။ ကုိညီေနမင္းကလဲ ''ပုိ႕စ္ေခါက္နည္း'' လုိ႕ ေခါင္းစီးတပ္ထားေတာ့ Jump Break လို႕ကုိ မသိခဲ့ရွာတဲ့ ကြ်န္ေတာ္ပါ။ ဒီေန႕မွာေတာ့ ကမ်ဥ္းရင္းကမ်ဥ္းရင္း Settings>Site Feed> Allow blog feeds ကုိ မ်က္စိေရးက်သြားခဲ့တယ္။ အဲဒီမွာ ႏွိပ္ၾကည့္ None , Short စတဲ့ေလးခု ေတြ႕၊ ဒါနဲ႕ ''ဒါျဖစ္မွာပဲ'' လို႕ ဆက္ဖတ္ၾကည့္ - ''ဟုတ္ၿပီးကြ'' လို႕ တစ္ကုိယ္ေတာ္ ေၾကြးေၾကာ္ၿပီး Save လိုက္ပါတယ္။ ''ေဆာ့ရီးပါ ကုိယ့္လူရယ္'' လို႕There are errors on this form နဲ႕ ေျပာလာျပန္ေရာ့။ ႏွစ္ခါ .. သံုးခါ - မရပါဘူးဗ်ာ။ လူကေလ လြဲခ်င္ၿပီဆိုရင္ အလွ်ိဳလုိက္ပဲ။ ''ေအာက္မွာၾကည့္ မင္းမွားတာ ငါျပထားတယ္ '' ေျပာလုိ႕ တစ္ေယာက္တည္း ေအာက္ငံု႕ၾကည့္မိေသးဗ်ာ။ သူေျပာတုိင္း လုပ္ရတာ တကယ္ပါ တပည့္ ပီသေနလုိက္တာ။ Post pages must be enabled, and descriptions set to Full. ဆုိတဲ့ သူ႕မွတ္ခ်က္အတိုင္း တုန္တုန္ယင္ယင္နဲ႕ Post pages ေတြကုိ အကုန္ Allow လုိက္လုပ္တယ္။ ၿပီးေတာ့ ျပန္လာ Short ထားၿပီး Save တယ္။ ဒီတုိင္းပဲ အမွားျခစ္ ေပးျပန္တယ္။ ဟာ ... လို႕ စိတ္ညစ္ညစ္နဲ႕ ထတဲ့ၿပီး ရႈးေျပးေပါက္လုိက္တယ္။ စိတ္တုိလြန္းလို႕ပါဗ်ာ။ အနီးနားမွာ ရန္ရွာစရာလူကလဲ မရွိ၊ ခ်စ္သူရင္ခြင္ၾကား ခဏနား -- ''အားပါး အခ်စ္ရယ္ ကုိယ့္ကုိ အေမာေျပ အားေပးအနမ္းေလး ေပးပါအံုးလားကြာ'' -- လို႕ စိတ္ေျဖစရာ ခ်စ္သူကလဲ ဟုိးးးးးအေ၀းႀကီးမွာ -- ရႈးရႈးသည္သာ ကြ်န္ေတာ့အတြက္ စိတ္ေျဖရာ ျဖစ္ေနပါေရာ့လား။ (ေျပာရင္း သတိရလိုက္တာ)။ ရႈးၿပီးျပန္လာ စိတ္မပါေတာ့ဘဲ ဆက္ဖတ္မိရာက Allow blog feeds မွတ္ခ်က္မွာပါတဲ့ jump break ကုိ ႏွိပ္လုိက္မိတာ။ Blogger Buzz ထြက္လာတယ္။ ဖတ္ၾကည့္လုိက္မွ အေမာေျပသြားရတယ္ဗ်ာ။ သူက ဆက္ညႊန္းတယ္ ...then follow the instructions at the bottom of this help article. လို႕။ help article ကုိ ႏွိပ္ၿပီး သြားလိုက္မွ ''အျပည့္အစံု က ဒီမွာပါလား ဟဲ့'' လို႕ ေလခ်ဥ္ထြက္သြားတယ္။ လုပ္ၾကည့္တယ္ဗ်ာ ... သူ႕အတုိင္း ။ ပထမ ပုိ႕စ္ တစ္ခုကုိ လုပ္ၿပီး ႀကည့္လုိက္တာ အကုန္ထြက္ေနတာပဲဗ်ိဳ႕။ ဘာ read more မွ ေပၚဘူး။ တစ္ခ်က္ျပာသြားတယ္။ ဒါနဲ႕ Dezign > Configure Blog Posts မွာ Edit ကေန ၀င္ၿပီး Post page link text: ထဲ read more လုိ႕ ေရးလုိက္ေသးတယ္။ အစက ဘာေရးထားတယ္မွတ္လဲ ... ''တင္ထားတာေလးေတြ'' ဗ်။ blog posts မွာ ေခၚစီးေပၚတဲ့ဟာ ထင္ေနတာကိုး။ မေပၚမွန္း သိတဲ့ေနာက္ အဲဒါ လွည့္ကို မၾကည့္ေတာ့ဘူး။ ခုနတုန္းကေတာ့ read more လုိ႕ ျပင္ေနၿပီ -- ဘာမွန္းမသိဘူးေနာ္ ... ဟုိက ျပင္ခုိင္းလို႕ ျပင္တာ။ အဲဒီ text box ေလးရဲ႕ ေနာက္မွာ ေတြ႕ပါလိမ့္မယ္ [?] ေလး ။ တစ္ခါမွ မႏွိပ္ခဲ့ဘူး။ ဒီတစ္ခါေတာ့ ''ဒါ အလကားေတာ့ မရွိႏုိင္ဘူး၊ သိစရာ ရွိေသးလို႕ ျဖစ္မယ္'' ဆုိတဲ့အေတြးေလးနဲ႕ လက္ကမ်ဥ္းေၾကာထလုိက္တယ္။ ဘာေပၚတယ္ထင္လဲ ... ကြ်န္ေတာ္ေတာ့ ကုိယ့္ကုိယ္ကုိယ္ နားပန္း တစ္ခ်က္ခ်လိုက္တယ္ဗ်ာ .. ''နင္ လက္ မကမ်ဥ္းတတ္လို႕ ခုထိ လူပ်ိဳေပါက္စ ျဖစ္ေနတာ -- ျဖစ္အံုးဟ'' ဆိုၿပီး။ စကားမစပ္ ေမးရအံုးမယ္ .. ဘေလာ့ဂ္ကမ်ဥ္းေနတဲ့ ခင္ဗ်ားေရာ ကြ်န္ေတာ့္လုိပဲ အဲဒီ [?]ေလး ေက်ာ္ခြသြားဖူးသလား?။ ဖူးတယ္ -- ဆိုရင္ေပါ့ ... ေလး,ငါး,ဆယ္ခ်က္မကသာ ခ်ထည့္လိုက္ပါ - ကုိယ့္နားပန္းကုိယ္။ ဟုတ္တယ္ဗ်ာ ဘာလုိ႕ အဲေလာက္ နေမာ္နမဲ့ (နားေမာ္နားမဲ့ <-- ကြ်န္ေတာ္ထင္တာ) ႏုိင္ရတာလဲ။ ကြ်န္ေတာ္က ကုိယ္ေစာင့္နတ္ ထြက္ေျပးမွာစုိးလို႕ အသာေလး တစ္ခ်က္ပဲ ခ်လိုက္တာ။ ခင္ဗ်ားေတာ့ --- ခ်သာခ် --- ကုိယ္ေစာင့္နတ္ တစ္ပါးေျပးရင္ တစ္ပါးျပန္လာ လိမ့္မယ္။ [ကုိယ္ေစာင့္နတ္ေတြက မိန္းကေလးေတြဆီမွာ ေနရတာ ရွက္လို႕တဲ့၊ ေယာက်္ားေလးေတြဆီမွာ ေနရာလုေနၾကာတာ] ။ အခုထိ ႏွိပ္မၾကည့္ေသးဘူးလား။ ဟာဗ်ာ။ ကြ်န္ေတာ္ေလ ႏွိပ္လို႕ထြက္လာတာကုိ ျပန္ပိတ္၊ Number of posts on main page: မွာ [ 5 ] ထား၊ Configure Blog Posts ကုိ ျပန္ Save လုိက္ပါတယ္။ ခုနားက Jump Break လုပ္ထားတဲ့ ပုိ႕စ္ေလးက ေခါက္ၿပီးသားေလးဗ်ာ read more ႏွစ္ခုနဲ႕အတူပါပဲ။ (အမွတ္တရမို႕ ႏွစ္ခု ထားလုိက္ေတာ့တာ၊ ဖ်က္ခ်င္ရင္ ရွာဖ်က္ေပေတာ့)။ က်န္တဲ့ ေလးခုက အရင္အတိုင္း ရွည္ၿမဲ ရွည္ၿမဲ။ ကြ်န္ေတာ္ေျပာခဲ့တယ္ေနာ္ .. Jump Break လုပ္ၿပီးကာစ ပုိ႕စ္ကုိ View လိုက္ေတာ့ read more နဲ႕ ပုိ႕ မလိပ္မေခါက္ရေသးတာ ေတြ႕လုိက္ရတယ္လို႕။ တကယ္ေတာ့ Jump Break က ၿဖစ္ေနၿပီ -- View တယ္ဆုိေတာ့ read more ကုိ ႏွိပ္ၿပီးသား ျဖစ္ၿပီေပါ့ဗ်ာ။ အဲဒါေၾကာင့္ ေခါက္လ်က္လိပ္လ်က္သား မျမင္ရတာပဲဗ်။ ကြ်န္ေတာ္ သတိတစ္ခ်က္ ရလုိက္မိတယ္ -- ကုိညီေနမင္း ေျပာတဲ့အတုိင္း လုပ္ၾကည့္တုန္းကလဲ အဲလိုပဲ မေပၚတာ ျမင္လို႕သာ ဖ်က္ခဲ့လုိက္မိတာလို႕။ ဟုတ္မဟုတ္ စမ္းၾကည့္ခ်င္လုိ႕ ကုိညီေနမင္း ေျပာထားတာေလးနဲ႕လဲ စမ္းၾကည့္ခ်င္ေသးတယ္ဆိုရင္ .... ေအာက္မွာ ျပန္လည္ တင္ျပေပးလုိက္ပါ့မယ္ ခင္ဗ်ာ။
ေအာင္ျမင္ပါေစ
ခ်စ္တဲ့သူနဲ႕အဆင္ေျပပါေစ
{အဟဲ ... ဘာမွေတာ့ ဆုိင္ဘူးထင္တယ္ေနာ္ ၊ အဲ ... ခ်စ္လြန္းလို႕ပါဗ်ာ}
ခ်စ္တဲ့ ပ်ိဳ႕ေမာင္ႀကီး
Peekaboo ပုိ႕စ္ေခါက္နည္း
ပုိ႔စ္ေခါက္နည္းကုိ ကၽြန္ေတာ္ေျပာျပပါ့မယ္ .
မေျပာခ်င္ template ကုိေတာ့ back up လုပ္ထားဖုိ႔ မေမ့ပါနဲ႔ .. ဒါမွ ကုိလုပ္တာ မွားယြင္းသြားရင္ အရင္ Blog ပုံစံအတုိင္း ျပန္ရမွာပါ .
(၁) blogspot ကုိ log in ၀င္လုိက္ပါ ..
(၂) Layout >> Edit HTML ကုိသြားပါ ..
(၃) </head> ကုိ ရွာပါ </head> မဆုံးခင္ေလးမွာ ေအာက္မွာ မွင္အနီနဲ႔ ျပထားတဲ့ script ကုိ ကူးထည္႔လုိက္ပါ။
<script src="http://www.sigmirror.com/files/27055_aeosc/myhacko.js" type="text/javascript" />
(၄) ၿပီးတာနဲ႔ save လုပ္ပါမယ္ ..
ေနာက္တစ္ဆင့္ထပ္သြားပါမယ္ .
(၅) layout >> Html မွာ Expand widget Templates ဆုိတာေလးကို check လုပ္ထားေပးပါ။
(၆) Ctrl+F ကို ႏွိပ္ၿပီး ေပၚလာတဲ႔ search box မွာ id='post' လို႔ ထည္႔ရွာလိုက္ပါ။ ၿပီးတာနဲ႔ ေအာက္ပါအတိုင္း ဟုတ္ရဲ႕လားဆုိတာကုိ လုိက္စစ္ၾကည့္လုိက္ပါ . မဟုတ္ဘူးဆုိရင္ ေအာက္ကအတုိင္း လုိက္ျပင္ေပးပါ . တူညီေအာင္ ေသခ်ာလုိက္စစ္ၿပီး ျပင္ေပးလုိက္ပါ . အဲ့လုိ မလုပ္ခ်င္ရင္လဲ နံပါတ္ (၇) နည္းအတုိင္း လုပ္ၾကည့္လုိက္ပါ...
<b:includable id='post' var='post'>
<div class='post uncustomized-post-template' expr:id='"post-" + data:post.id'>
<a expr:name='data:post.id'/>
<b:if cond='data:post.title'>
<h3 class='post-title'>
<b:if cond='data:post.url'>
<a expr:href='data:post.url'><data:post.title/></a>
<b:else/>
<data:post.title/>
</b:if>
</h3>
</b:if>
<div class='post-header-line-1'/>
<div class='post-body'>
<b:if cond='data:blog.pageType == "item"'>
<p><data:post.body/></p>
<b:else/>
<style>#fullpost {display:none;}</style>
<p><data:post.body/></p>
<span id='showlink'>
<p><a expr:onclick='"javascript:showFull(\"post-" + data:post.id + "\");"' href='javascript:void(0);'>Read More...</a></p>
</span>
<span id='hidelink' style='display:none'>
<p><a expr:onclick='"javascript:hideFull(\"post-" + data:post.id + "\");"' href='javascript:void(0);'>Thank...</a></p>
</span>
<script type='text/javascript'>
checkFull("post-" + "<data:post.id/>");
</script>
</b:if>
<div style='clear: both;'/> <!-- clear for photos floats -->
</div>
အေပၚက စာလုံးအနီျပထားတဲ့ေနရာမွာ ျမန္မာလုိလဲ အစားထုိးလုိ႔ရပါတယ္ .
Read More ေနရာမွာ ဆက္လက္ဖတ္႐ွဳ႕ရန္ (သုိ႔) သင္ႀကိဳက္ႏွစ္သက္ရာ
Thank ေနရာမွာ ေက်းဇူးတင္ပါတယ္ (သုိ႔) သင္ႀကိဳက္ႏွစ္သက္ရာ ကုိေျပာင္းႏုိင္ပါတယ္ .
(၇) အေပၚကလုိ ျပန္ျပင္ေနရမွာ ေၾကာက္ေနရင္ ေအာက္ကတစ္နည္းနဲ႔ စမ္းၾကည့္လုိက္ပါ ..
<b:includable id='post' var='post'> ႏွင့္ <div style='clear: both;'/> <!-- clear for photos floats --> </div> ၾကားထဲမွာ ရွိတဲ့ စာသားေတြအကုန္လုံးကုိဖ်က္ၿပီး အေပၚက ေပးထားတဲ့အတုိင္း အစားထုိးလုိက္ရင္လဲျဖစ္ပါတယ္ ....
(၈) အားလုံးၿပီးသြားရင္ေတာ့ Setting >> Formatting Tab ကုိသြားျပီး Post-Template ေနရာမွာ ေအာက္က မွင္နီနဲ႔ ေရးထားတဲ့ စာသားေလးမ်ားကုိ ရုိက္ပါ။
Type your summary here.
<span id="fullpost">
Type the rest of your post here.
</span>
(၉) ၿပီးတာနဲ႔ Save လုပ္ပါ။
ပုိ႔စ္တင္တဲ့ေနရာမွာ ကုိက တစ္ခု သိထားရမွာရွိပါတယ္ .Type your summary here. ဟာ နိဒါန္း တစ္နည္းအားျဖင့္ ပုိ႔စ္တင္တဲ့အခါမွာ ျပထားမယ့္ စာအနည္းငယ္ပါ ..
Type the rest of your post here. ကေတာ့ က်န္တဲ့ စာအကုန္လုံးကုိ ရုိက္ထည့္ရမွာပါ .. အဆင္ေျပမယ္လုိ႔ေမွ်ာ္လင့္ပါတယ္ .
ေက်းဇူးတင္ပါတယ္ ...
ညီေနမင္း


Appreciate this post. Let me try it out.
ReplyDeleteFeel free to visit my web-site - creative group