ဘေလာ့ဂ္ လက္ေခ်ာ္လက္လြဲ ျဖစ္သြားလုိ႕ ပ်က္သြားမယ္ဆုိရင္ back up လုပ္ထားတဲ့ဖုိင္ေလးကုိ import လုပ္ၿပီး အရင္အတုိင္းေလး ျဖစ္ေအာင္ ျပန္လုပ္ဖုိ႕အတြက္ပါ။ template ေဒါင္းယူတာနဲ႕ မတူပါဘူးခင္ဗ်ာ။ အၿမဲတမ္း လုပ္ထားသင့္တာေလးပါ။ အေရးႀကံဳမွ သိမွာမုိ႕ ..... ကုိညီေနမင္း တင္ျပထားတာေလးကုိ မွ်ေ၀လုိက္ရပါတယ္ခင္ဗ်ာ။
လုပ္နည္းက လြယ္ပါတယ္ .
(၁) blogger.com ကုိ log in ၀င္လုိက္ပါ .
(၂) setting >> Basic ကုိ သြားၿပီး ပုံ(၁)မွာလုိ Export blog ကုိ ေရြးလုိက္ပါ .
(၃) ၿပီးရင္ ေပၚလာတဲ့ box ထဲက Download blog ကုိ ႏွိပ္လုိက္ပါ .
(၄) Save လုိက္ပါ . (တစ္ခါတစ္ရံ Downloader ေတြနဲ႔ Download လုပ္ရင္ .xml ဖုိင္ကုိ မရတာမ်ိဳးႀကံဳရတတ္ပါတယ္ . အဲ့ေတာ့ သမရုိးက်အတုိင္းပဲ save လုိက္ပါ )
(၅) အဲ့မယ္ .xml ဆုိၿပီးေတာ့ ဖုိင္တစ္ဖုိင္ရလာပါလိမ့္မယ္ .
(၆) အဲ့ဒီ့ရလာတဲ့ ဖုိင္ကုိ ကုိ Import လုပ္ခ်င္တဲ့ ဘေလာဂ္ကုိ ဖြင့္လုိက္ပါ .
(၇) setting >> basic ကုိသြားၿပီး Import Blog ကုိ ေရြးလုိက္ပါ .
(၈) အခုနက ရလာတဲ့ .xml ဖုိင္ကုိ ေရြးပါ။ automatic public blog ကုိ အမွန္ျခစ္ေပးပါ။ သူေပးထားတဲ့ code ကုိ ရုိက္ထည့္ၿပီး Import Blog ကုိ ႏွိပ္လုိက္ပါ .
ကဲ အဆင္ေျပပါေစဗ်ာ ..
nyinaymin.com
ပုိပုိလိုလို အဂၤလိပ္လို ၾကည့္ခ်င္တဲ့သူမ်ား ရွိခဲ့ရင္ ၾကည့္ႏုိင္ဖို႕ ကူးယူတင္ျပလုိက္ပါတယ္ခင္ဗ်ာ။
How to backup and restore blog with EXPORT
There have been frequent incidences of bloggers accidentally deleting their blogs or having Blogger deleted their blogs, etc., so it is good practice to backup your blog so that you can restore it when such calamities happened. Previously we had to use Blog Collector to backup blog. However, Blog Collector had its limitations plus restoring the blog is tedious. Furthermore, Blog Collector only backup text, it does not backup links, embedded content like videos or music players, comments and photos. (note: uploaded photos are hosted at Picassa Web Album, so if your Picassa Web Album account is deleted, those photos will be lost)
Now that Blogger had introduced import blog and export blog, backing up and restoring your blog is very easy. Furthermore, links, embedded content, comments and photos is also easily backed up and restored with just a couple of clicks.
To backup your blog, sign into Blogger Dashboard, go to Settings > Basic and you will see 3 links: import blog, export blog, delete blog.

Click export blog and Bloger will create an xml file for you to save into your computer. You would be well advised to save the xml file with a suitable file name and/or in a folder which will enable you to not only easily locate it when needed, but also to distinguish it from a backup template xml file because both are xml files and both will have identical icon

If something drastic happened to your blog, you can similarly go to SETTINGS > BASIC, but this time click import blog, click BROWSE and browse to your exported xml file, complete the captcha (word verification), select whether to automatically publish all imported posts or not, then just click Import blog.
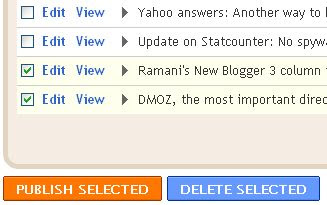
Now a note on the option to automatically publish all imported posts and the possibility of triggering Blogger's bot to mark the imported blog as a spam blog. If you are worried, then you should not tick the box for all imported posts to be published automatically. You will then get a list of imported posts, after which you can publish the posts in batches by ticking some posts and then clicking PUBLISH:

I have tested importing and simultaneously 400+ posts and the test blog was not marked as a spam blog. However, I do not know if you do that you will be as lucky as before I import and publish so many posts simultaneously, I added a noindex meta tag to the template.
This import export features can also be used to export your Blogger blog to other blogging platform like Wordpress, Live Journal, etc., or to import blogs from Wordpress, etc., into your Blogger blog.
မူရင္း http://www.bloggertipsandtricks.com/2009/08/how-backup-and-restore-blog.html

0 Comments:
Post a Comment